
WordPress multisite is termed as a feature through which a developer could easily create a network of multiple sites at a single platform after the installation of WordPress. This feature is available from version 3.0 to onwards that was released in 2010 to provide more advanced and latest technological information towards the public. The chain of multi-site is based upon the continuation of WPMU or WordPress multiuser projects. But after a while, the WPMU discontinued and all the features were admitted into WordPress core. With reference to its manual and practical process following are the steps that you need to follow in order to build a WordPress multisite setup on your own.

Requirement of Installing WordPress Multisite:
First and the foremost step in this context is the installation of WordPress multisite but before installing it you need to check the following requirements to follow the WordPress multisite installation:
- Already installed WordPress.
- Activate your permalinks
- Make sure to deactivate all the plugins.
- Get the FTP access to the WordPress installation
Manual Multisite In Wp-Config.php:
In order to go in a manual way following are the subsequent steps that required to follow:
- Create an FTP connection to your website.
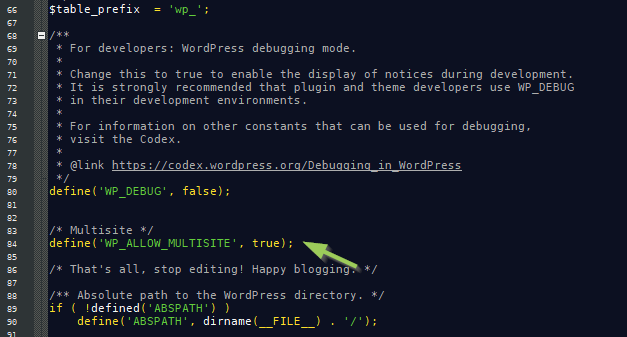
- Within the main directory of your WordPress open the wp-config.php file and enter the line:
define('WP_ALLOW_MULTISITE', true);above the line:
/* That's all, stop editing! Happy blogging. */- Enable the multisite feature in your WordPress that is already installed.

Install The WordPress Network:
Moving towards the installation of WordPress network following are the steps that you have to follow under the protocols:
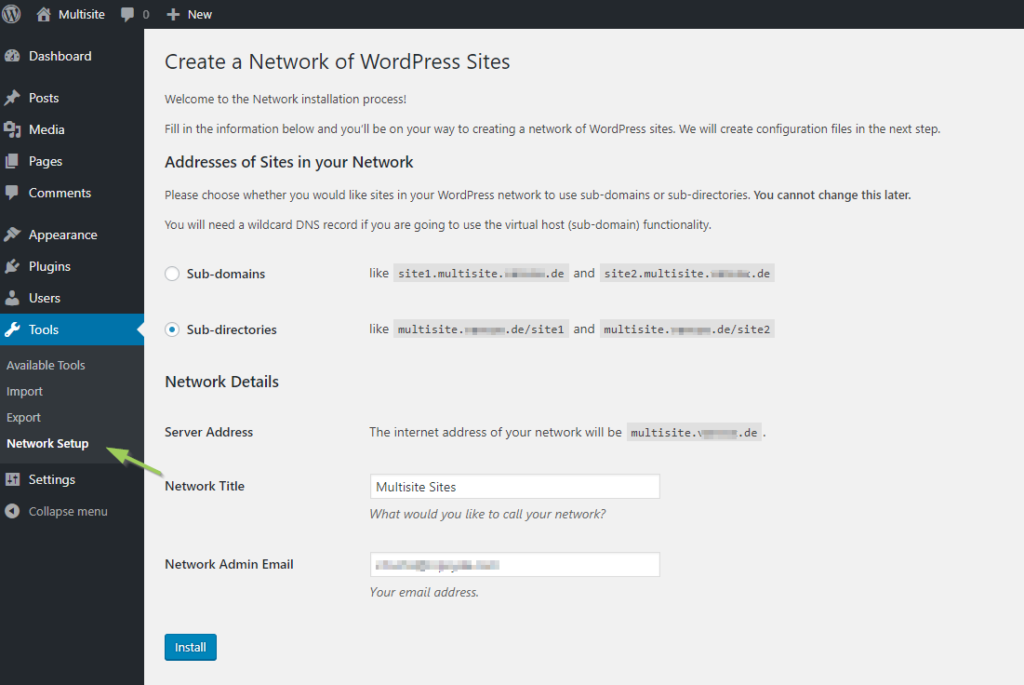
- First login to your WordPress site.
- On the right side of the ribbon, you would find an icon or tool to select it.
- Decide over there that rather you need subdomains for your multisite or not? Because this may affect your overall site network settings
- In the section of details enter the name of your network.
- Then enter the respective email address of the site’ admin
- At the end click over the install button.
Coding Towards wp-config.php and .htaccess:
In the root directory of your WordPress add two snippets of code in the wp-config.php and .htaccess files in the following manner:
- Set up the connection of FTP with your website.
- The first code of wp-config.php that needs to add would be.
define('MULTISITE', true);
define('SUBDOMAIN_INSTALL', true);
define('DOMAIN_CURRENT_SITE', 'My Website');
define('PATH_CURRENT_SITE', '/');
define('SITE_ID_CURRENT_SITE', 1);
define('BLOG_ID_CURRENT_SITE', 1);- Replace the other WordPress rule and enter your second code in the .htaccess file likewise.
RewriteEngine On
RewriteBase /
RewriteRule ^index\.php$ - [L]
# add a trailing slash to /wp-admin
RewriteRule ^wp-admin$ wp-admin/ [R=301,L]
RewriteCond %{REQUEST_FILENAME} -f [OR]
RewriteCond %{REQUEST_FILENAME} -d
RewriteRule ^ - [L]
RewriteRule ^(wp-(content|admin|includes).*) $1 [L]
RewriteRule ^(.*\.php)$ $1 [L]
RewriteRule . index.php [L]- Then save both of the files in order to proceed further.
Network Administration & It’s Settings:
After changing the wp-config.php and .htaccess files respectively you may be able to find the new menu of Network Admin within the main bar where all of your listed sites would be on board. All the icons and their function must be the same as you always find in the ribbon of your WordPress dashboard including plugin, themes, settings, users and etc.

Add New Website To The Network:
Behind the main core of the whole procedure is adding multiple sites at one site. No matter what time it is or how many sites you are adding in the following ways.
- Go to my site button and click on add new site.
- Enter the desired website address that you want to add as a multisite.
- Mention the title of the respective website that actually added in the last step.
- Make sure to choose a suitable language for your new site.
- Enter the admin email address but it must be different from the whole network.
- In the end select a new site then your new site would be displayed in my site section.

Installation of Plugins & Themes In WordPress Multisite:
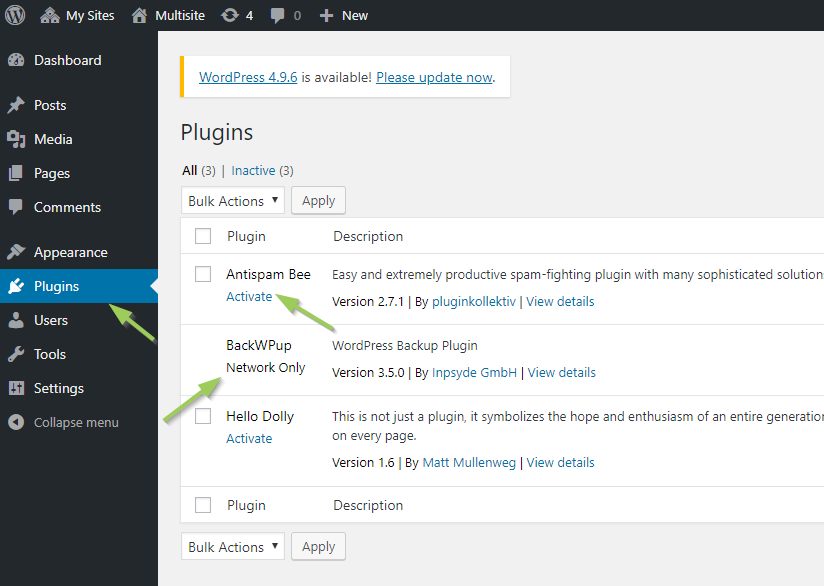
After adding your site in the list of multistate the next step is to install the related themes and plugin of that particular site. Only the site admin could perform this task by activating or deactivating the related themes and plugins in one go.
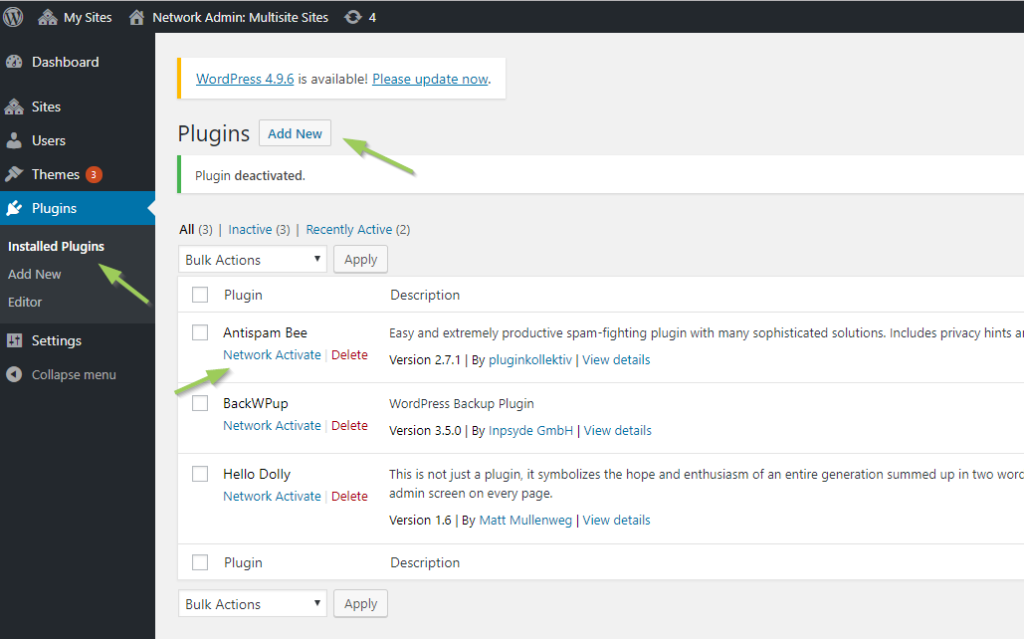
If you are a super admin then you may also find this field under the button of network admin.

Whilst, as a site admin the things would be quite different as you may see in the next picture.
The completion of this step indicates that your site has been listed as a multisite. However, if you get stuck at any point then feel free to ask us through the given comment section till then for further details stay tuned with us and don’t forget to bookmark.
Featured Image Credit By: multilingualpress.org